|
#1
 Hoy, 08:40:00
|
||||
|
||||
 Review of the TerraMaster F4-425 Pro NAS
Review of the TerraMaster F4-425 Pro NAS  The TerraMaster F4-425 Pro is a NAS that makes it clear from the very first moment that it plays in a fairly serious league. Its design has presence, the build gives off a fantastic feeling, and the whole package has that professional product vibe that we do not always find in this type of device. But this model does not want to be simply a place to store files. With its 4 drive bays, 16GB of RAM and a very visual proprietary operating system, the F4-425 Pro presents itself as a small home or professional server capable of handling backups, network storage, multimedia services, apps, file syncing and many other possibilities. In this review, we are going to focus on the general experience with the device: design, installation, operating system, use with hard drives and impressions after testing it for several days. Let's take a look.  This is the box we received.  Let's look inside, which, logically, comes very well protected against possible knocks.  This is all the content. Let's go over every element.  Among the accessories we find some small labels to identify each installed hard drive. It is a simple detail, but quite practical if we are going to use several drives in the NAS, since it lets us mark the capacity or purpose of each HDD and keep everything under control from the very beginning.  The included documentation is simple and straightforward, with a quick installation guide in several languages to get the TerraMaster F4-425 Pro up and running without too many complications.  A small plastic tool for the drive trays is included, useful for handling or unlocking the NAS front compartments.  Screws are also included to secure 2.5-inch drives, both small hard drives and SATA SSDs, which is useful if we want to install solid-state storage in the main trays.  We find a Cat 6 network cable, an important detail in a NAS of this level, since it allows us to take advantage of fast connections such as 2.5GbE without any problem, as long as our router, switch or computer is also compatible.   Power is provided by an external 90W adapter, accompanied by its corresponding European power cable.   It is a common solution in this type of NAS, as it keeps the power supply outside the chassis and helps reduce heat inside the device itself.  The TerraMaster F4-425 Pro makes a really strong first impression. It is a fairly large NAS, but it does not feel bulky or crude. Quite the opposite: it feels very well cared for, with a sober, elegant and quite professional design. The black front contrasts very nicely with the metallic grey body, and the four bays are perfectly integrated into the whole design, giving it the look of a serious product intended to run for many hours without drawing too much attention. The build is one of the aspects that surprises the most as soon as you have it in front of you. It feels robust, well finished and with a presence above that of many simpler home NAS devices. It is not necessarily a device designed to be hidden away in a corner, because visually it has plenty of character, although the logical thing will be to place it near the router or in a well-ventilated area. On the front we find the four drive trays, the power button and a USB port, all arranged in a clean and accessible way. The initial feeling is that of being in front of a device closer to a small personal server than to a simple network hard drive. And that, even before turning it on, already makes it quite clear where this F4-425 Pro wants to go.  The front is dominated by the four drive trays, each with the TerraMaster logo discreetly integrated. The textured black finish helps reinforce that feeling of a robust and professional product, while also doing a pretty good job of hiding fingerprints and small marks from daily use.  On the right side of the front we find the power button and a quick-access USB port, very useful for connecting an external drive occasionally or performing direct copies without having to reach the back of the device. Everything is nicely integrated into the design, maintaining that clean and professional appearance.  The NAS chassis combines a metallic grey body with a black front, a fairly recognisable mix within the brand and one that suits this model especially well. The finish is sober, clean and elegant, without any flashy elements, but with enough presence to convey that we are dealing with a serious device. It does not look like a simple desktop accessory, but rather a small server designed to run continuously.  In terms of size, it is clear that this is not a compact device, but it is not disproportionate either considering that we are talking about a NAS with four bays for 3.5-inch hard drives. The chassis is quite deep, as is logical in this type of product, although the rounded design and the absence of unnecessary elements help prevent it from looking like a huge block.  The comparison with my hand makes it clear that it takes up its own space, but it is still perfectly reasonable to place it on a desk, shelf or next to the router. The overall feeling is very good: robust, well finished and with a build that inspires confidence from the very first contact. It is one of those products that looks even better when you have it in front of you.  The rear makes it clear that this is not a basic NAS. The first thing that catches the eye is the huge central fan, responsible for moving air throughout the inside of the chassis and keeping the temperature of the drives under control. It is a logical decision in a device designed to work for many hours at a time, especially if we install several mechanical drives. All the connectivity is concentrated on the left, with a fairly neat layout. We find a small reset button, HDMI output, two 5GbE network ports, two 10Gbps USB-A ports, a USB-C port also rated at 10Gbps, and the power input.  The presence of dual high-speed Ethernet is especially interesting, because it allows us to get much more out of the NAS than with a traditional Gigabit connection, as long as our network is ready for it.  As you can see, the rear area is well used and reinforces that idea of an advanced product: good ventilation, generous connectivity and enough ports to work with external drives, quick backups or additional accessories without running short right away.  On the bottom we find several ventilation grilles, a label with device information and four rubber feet that help keep it stable on the desk, while also slightly raising the chassis to improve airflow.   You can also see the screws that allow this cover to be removed. As we will see later, removing it gives access to the internal area where the M.2 slots and RAM memory are located, which is very interesting if we want to expand or inspect some of the NAS components.  The four front bays are one of the most important parts of the device, because this is where we will install the main storage drives.  Each tray is easily removed from the front, without needing to disassemble the whole NAS, which is essential in a device designed to work with several drives at once.  These bays are mainly prepared for 3.5-inch SATA hard drives, which are the usual desktop mechanical HDDs and the most recommended option for this type of product if we are looking for lots of capacity, a good price-per-TB ratio and continuous operation. Ideally, we should use NAS-specific drives, such as the well-known WD Red, Seagate IronWolf or Toshiba N300 ranges, as they are designed to work for many hours, withstand vibrations and operate in RAID configurations. It is also possible to install 2.5-inch SATA drives, such as SSDs or laptop hard drives, although in that case they must be secured to the tray with the screws included in the box. This option can be interesting if we are looking for more silence or faster access times, although for mass storage it still makes more sense to go for 3.5-inch mechanical drives.  It is worth clarifying that these trays are not for M.2 NVMe drives, as those go in another internal area of the device, and they are not suitable for old IDE/PATA drives either. Here we need modern SATA drives.  Once the drives are installed, the system will be able to use them in different ways, for example as independent storage or through RAID configurations, which allow several drives to be combined to gain security, performance or capacity depending on what we need.  Let's look at a few more photos of the device. As I mentioned, it looks even better in person.       Before continuing, let's take a look at it on video. At this point, it is worth explaining properly what a NAS actually is and why a device like this should not be seen simply as an expensive hard drive. A NAS, short for Network Attached Storage, is basically a storage system connected to the network. The idea is simple: instead of having our files scattered across several computers, USB drives, phones or cloud services, we can centralise everything in a single device that is accessible from home, from the office or even remotely if we configure it for that. The big difference compared with a traditional external drive is that here the storage does not depend on being connected by USB to a specific computer.  The NAS works independently, connected to the router or a network switch, and can remain powered on 24 hours a day. From a PC, a Mac, a phone, a tablet or even a Smart TV, we can access shared folders, backups, photos, videos, documents or multimedia servers. For less technical users, it could be summed up as a private cloud installed at home, but with much more control over the data. In addition, this type of device allows us to work with several drives at once. 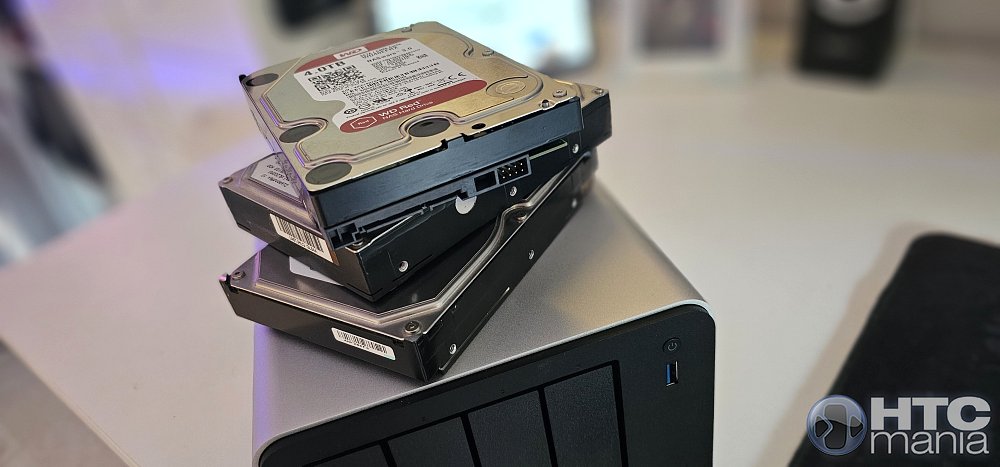 That opens the door to RAID configurations or similar systems, where drives can be combined to gain speed, capacity or protection against failures. For example, we can make part of the information duplicate across drives so that, if one unit fails, we do not immediately lose the data. This does not replace an external backup, but it does provide a very important layer of peace of mind compared with using a single standalone drive. In the case of this model, TerraMaster proposes a NAS that is far more ambitious than basic entry-level devices. We are talking about a unit with four SATA bays for 2.5 and 3.5-inch hard drives or SSDs, 16GB of DDR5 RAM, an 8-core Intel N350 processor, dual 5GbE network ports, high-speed USB connections, HDMI output and three M.2 slots for NVMe SSDs. In other words, it is not designed only to store files, but also to run services, applications and more demanding tasks. And this is where the concept of a small home or professional server begins to make sense. With this hardware we can set up automatic backups, a private cloud, a multimedia server, syncing between devices, shared folders for multiple users, downloads, web services, databases, Docker containers, home automation tools or even more advanced applications. Obviously, we are not going to analyse every single possibility, because each application would deserve its own separate article, but it is important to be clear that the potential of the device goes far beyond pure storage.  The operating system is also important. TerraMaster uses TOS, an interface accessed from the browser that behaves very much like its own desktop, with windows, icons, an app centre, a control panel and monitoring tools. This is not Windows or macOS installed inside the NAS, but the visual experience is closer to a modern desktop system than to the typical cold network administration panel. That helps a lot so that users who are not especially experienced can move around with a certain level of comfort from the very beginning. Before installing the main drives, we are going to open the device and take a look inside. The process is quite simple: just remove four screws from the bottom area to release the casing and access some of the internal components. It is not something we are going to do every day, but it is appreciated that access is not especially complicated.   In this area we find the RAM memory and three slots for M.2 NVMe drives. In a NAS like this, they do not necessarily have to be used as main storage in the style of a normal hard drive, but they can play a very interesting role as SSD cache.  The idea of cache is simple: 3.5-inch mechanical hard drives offer lots of capacity at a good price, but they are not as fast as an SSD, especially when there are lots of small files, repeated accesses or several tasks running at the same time. An M.2 drive can help the system speed up certain operations by temporarily storing frequently used data so that access is faster. In practice, this can be especially noticeable in scenarios with several applications, databases, heavily used folders, multimedia services, frequent backups or containers. It should not be confused with installing an SSD and having the whole NAS automatically become faster. If we copy a huge file just once, the limit may come first from the network or from the drives themselves. But in real use, with several tasks running, repeated accesses and installed services, having a fast cache can help the device respond more smoothly.   In our unit we used these slots to install a 512GB M.2 drive and test this possibility. It is a detail that fits very well with the focus of the product, because it combines the best of both worlds: traditional hard drives to store many terabytes and internal SSDs to speed up certain system tasks. 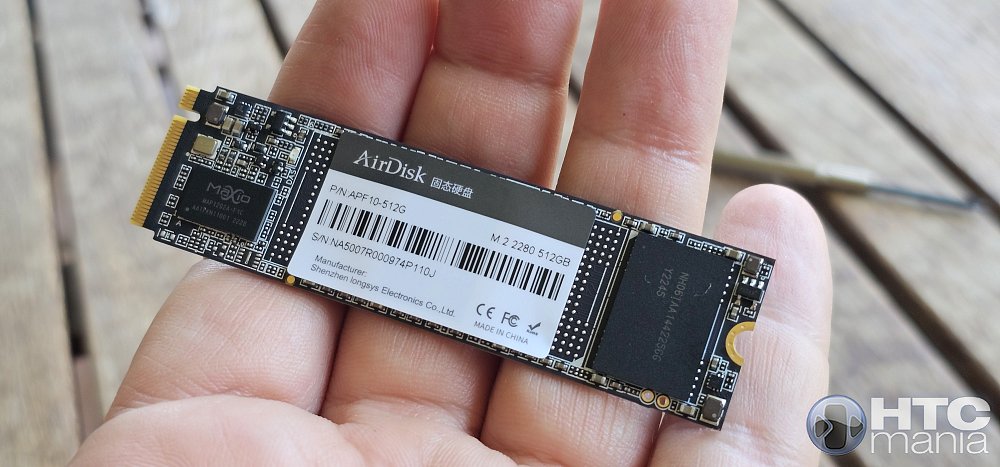 Done.  Here we also find the RAM module. In our unit it is a 16GB DDR5 SO-DIMM module. This is an important detail, because this amount of RAM gives plenty of room to work with several applications, background services, backups, containers or simultaneous tasks without the device running short of resources. I would say it can be expanded up to 32GB without any problem.  For the tests we are going to use four hard drives from different brands and with different capacities, something that would not necessarily be the ideal configuration for permanent use, but which allows us to check the general operation of the NAS, drive installation, volume creation and the experience with several drives installed at the same time. The main drive will be this 4TB WD Red, a 3.5-inch mechanical hard drive specifically designed for NAS systems. In this type of device, it makes quite a lot of sense to use drives of this kind, since they are designed to work for many hours, coexist with other drives inside the same chassis and offer a good balance between capacity, reliability and price. Unlike an SSD, a mechanical HDD is not intended to offer the best access times, but it remains the most logical option when we want many terabytes for backups, personal files, multimedia or shared storage. In a four-bay NAS, we can also combine several drives to create RAID configurations or similar setups, gaining protection against failures or making better use of the available capacity.  Installing the drives is quite simple and does not require much effort. Each bay uses a removable tray where we place the drive before inserting it into the NAS. In the case of 3.5-inch hard drives, the system is very convenient: simply remove the side brackets from the tray, place the drive in the correct position, snap those brackets back into place and slide the tray back into its slot.  It is important to pay attention to the orientation of the drive, since the SATA connector must face the inside of the device so that it connects correctly at the back of the bay.  Once installed, the tray slides in smoothly and remains well fitted, without any feeling of looseness. It is a fairly intuitive process even for users who have never assembled a NAS before, and it allows drives to be installed or replaced without having to open the entire device.  We are going to insert four drives.  Getting started is not much of a mystery. We only have to connect the power adapter, plug the Ethernet cable into the router or network switch, and press the power button on the front. From there, the device starts booting and is ready to be detected from the browser or using TerraMaster's tools.  On the front we will also see the LED indicators corresponding to the installed bays. Depending on the number of drives we have inserted, more or fewer indicators will light up, allowing us to check at a glance which units are present and active. If any of these LEDs blink, it means that the drive is registering activity at that moment.  To begin the setup, TerraMaster recommends using the TNAS Mobile app, available for smartphones. The process is quite simple: with the NAS powered on and connected by Ethernet cable to our network, we open the app from a smartphone connected to the same WiFi network and the device should automatically appear in the list of local devices. In our case, it was detected without any complications, showing its IP address, the network interface being used and the initial state of the system, still uninitialised. Although the mobile app makes it easy to locate the NAS on the network, the system itself invites us to continue the setup from a computer browser, which is quite logical considering that we are going to enter data, create users and configure storage. We simply access the IP address shown by the app to enter the initial TOS assistant. The first step is to create the system administrator user, together with its password and basic access details. This will be the main profile from which we will manage the NAS, install applications, create shared folders, configure permissions and manage the drives. The process is quite guided and not complicated, although it is advisable to use a secure password, since we are talking about the device where we will probably end up storing a good part of our important information. Once the initial TOS setup is complete, the system guides us directly to one of the most important steps: creating the storage. In order to use the installed drives, it is not enough for the NAS to detect them. First we have to create a storage pool and then a volume where the data will be stored. The assistant is quite clear even for users who are not used to this type of device. In our case, the system correctly detected the installed drives, showing the model, capacity and status of each disk. From there we can select which drives we want to use and decide how they will be organised. This point is important because using the drives independently is not the same as combining them in a RAID or similar configuration, where capacity, protection against failures or performance can be prioritised.  We also have to bear in mind that, if we use drives from different brands and with different capacities, as in our tests, the final available capacity will depend on the chosen configuration. The system does not always make use of 100% of the raw space of all drives, especially if we are looking for protection against the failure of one disk. During the process we are also asked to choose the file system. TOS recommends Btrfs, a modern option that enables advanced features such as system snapshots and more complete backups. ext4 also appears, a more traditional alternative widely used in Linux systems. For most users, the logical choice will be to leave the recommended option unless they have a specific need.    The next step is to create the shared folders. Although the volume has already been created, we still need to define where the files will be stored and how we are going to access them from other devices. These folders will later be the ones we see from Windows, macOS, a phone or any device connected to the network.  The concept is simple: we can create one folder for backups, another for photos, another for videos, another for documents or any structure that is comfortable for us. Each shared folder can have its own permissions, so not all users necessarily have access to everything. For example, we can allow one user only to read files, another to modify them, or make certain folders private. This step is important because it turns the internal storage of the NAS into something truly useful within the network. From here, the device stops being just a set of configured disks and begins to behave like a file server accessible from different devices.    Before continuing with the setup, it is worth taking a moment to look at the concept of RAID, because it is one of the keys to this type of device. Put simply, RAID is a technology that allows several hard drives to be combined so that they work as a single storage system. Depending on how it is configured, we can look for more speed, more protection against failures or a mix of both. For example, in a simple configuration we could use each drive independently, but that does not really take advantage of the possibilities of a NAS with several bays. With RAID 0, information is distributed across several disks to gain performance, although it offers no protection if one drive fails. RAID 1, on the other hand, duplicates the data on two disks, so if one fails we still have the information on the other. RAID 5 uses at least three disks and allows the system to keep running if one unit fails, while RAID 6 increases that protection and can tolerate the failure of two disks. RAID 10 combines mirroring and data striping, seeking both security and performance, although it requires more drives and uses less available capacity.  The important idea is that RAID does not make drives indestructible. It helps protect us against certain physical failures and allows the system to keep running if one unit breaks, but it does not replace a backup. If we accidentally delete a file, if there is data corruption or if the device suffers a serious problem, we will still need an external backup or one stored in another location. In TerraMaster's case, in addition to traditional RAID modes, we find TRAID, its own flexible disk management system. The advantage of TRAID is that it is designed to make life easier for the user, especially when not all drives have the same capacity. In traditional RAID, mixing disks of different sizes can waste quite a lot of space, because many configurations use the smallest disk as the reference. TRAID tries to manage that situation more intelligently, automatically combining the available space and maintaining protection against the failure of one drive when at least two disks are installed. This is especially interesting for home users or small offices that expand the NAS little by little. We can start with certain disks and later replace them with larger ones or add new drives, letting the system manage the expansion more easily. There is also TRAID+, a variant aimed at those looking for more security, since it allows the failure of two disks to be tolerated, although it requires more drives and reduces the usable capacity available. In our tests, where we used disks of different brands and sizes, TRAID makes quite a lot of sense precisely because of that flexibility. It is not the only option available, but it is probably the most convenient for anyone who wants to start using the NAS without having to study every traditional RAID type in depth. This infographic can help make everything easier to understand.  Once the volume and shared folders have been created, we can access the main desktop of TOS, TerraMaster's operating system. The first impression is quite positive, because the interface moves away from the typical cold administration panel and feels more like a modern desktop, with wallpaper, windows, icons and shortcuts at the top. From that top bar we have many of the important tools close at hand: file management, control panel, storage, applications, terminal, Docker and other system shortcuts. Everything is presented in a visual and fairly orderly way, which helps a lot if we are not used to moving around a NAS.  On the right we find a side bar with quick access to system information, notifications, search and help. From there we can check basic hardware data, such as system load, CPU usage, available memory, network activity or LAN connection information.  In general, TOS feels quite polished. This is not Windows or macOS, but it is a very visual web environment that makes managing the device much friendlier than one might expect from a product of this type.  At this point, it is worth making something clear: trying to go through every single option offered by this device would make the review endless. TOS includes many tools, settings and possible applications, so in this review we are going to focus on a general view of what we find and how the system feels during everyday use, without turning the article into an endless technical manual. One of the most important sections of TOS is the Storage Manager, from where we can control everything related to the installed drives. This screen sums up very well how the storage is organised inside TOS. At the top we see that the system detects the four installed SATA drives and also an M.2 drive, used in our tests to create the SSD cache. In the lower area, the full flow appears: the physical drives are grouped into a storage block using TRAID, then the main volume is created in Btrfs and, finally, Hyper Cache is added to speed up certain operations with the help of the SSD. In our case, the main volume ends up with 3.38TB available, a logical figure considering that we are using drives with different capacities and a configuration with data protection. The Hyper Cache is also shown with 476.72GB, corresponding to the installed SSD. This view is quite clear even for users who are not too experienced, because it lets us understand at a glance which disks are installed, how they are being used and what role each part plays within the system.  The backup section is one of the most complete parts of TOS, to the point that it can feel somewhat overwhelming. TerraMaster includes several tools aimed at different scenarios, from backups of Windows computers or servers to device syncing, cloud backups, system snapshots or direct copies from USB drives. Within this block we find solutions such as Centralized Backup, Duple Backup, TerraSync, CloudSync, Snapshot, USB Copy and TFM Backup, among others. Not all of them are intended for the same type of user: some have a more domestic focus, such as syncing files between computers or saving copies to the cloud, while others clearly point to small businesses or environments where a more serious backup strategy is needed.  The feeling is that there are tools for practically any need related to data protection. We can use the NAS as a centralised destination for backups, sync folders between computers, create snapshots to recover previous versions or even set up disaster recovery schemes with another device or cloud services. In this review we are not going to go deep into each of these options, because they would deserve a separate analysis, but it is clear that the system is very well prepared to become the centre of our backups.   The Control Panel once again reinforces the feeling of being in front of a fairly complete operating system. From here, many of the NAS's important settings are grouped together, organised by categories such as users, groups, shared folders, network, file services, terminal, security, notifications, scheduled tasks, system logs and device monitoring. The number of options is impressive, but the presentation helps prevent us from getting too lost. Everything appears distributed through large icons and clear sections, with a search bar at the top to locate specific settings without having to go through every menu. It is clear that those who only want to use the device to store files will not need to touch everything, but it is also appreciated that there is room to configure the system in quite some depth if we want to get more out of it.   Another point I liked is the amount of information the system provides about the status of the NAS. From the panel itself we can check network data, IP address, MAC, LAN connection status, CPU usage, memory, device temperature, fan speed, volume usage, drive status and read or write activity. The presentation is quite visual, with graphs and panels that are easy to understand, but without giving up technical data for those who want to dig a little deeper.   One of the most interesting parts of the system is the possibility of installing applications and turning the NAS into something much more versatile than a simple storage space. From the app centre we find tools for managing photos, making backups, syncing files, working with multimedia services or expanding the device's functions according to our needs. This includes well-known options such as multimedia servers like Plex or Jellyfin, private cloud solutions, syncing tools, backup applications and services designed to have the device working continuously in the background. For a home user, this can mean centralising photos, videos, documents and backups. For someone more advanced, the NAS can become a small platform of services running 24/7.  In addition, with Docker and access to more advanced tools, the door also opens to installing solutions such as Home Assistant for home automation or even more specific projects such as custom agents and services, as long as we know how to configure them correctly. We are not going to go deep into every application because it would be endless, but it is clear that the software ecosystem is one of the device's great strengths.  As a curiosity, I installed OpenClaw, a fairly popular AI agent among more advanced users, and it worked without problems on the NAS hardware. We are not going to get into its installation or configuration, because that falls outside the objective of this review, but it serves as a good example of the room offered by the device to run more specific services beyond the classic storage, backup or multimedia applications.   I also installed Hermes via Docker and it worked perfectly as well. Beyond multimedia or backup applications, the NAS can also be used for other quite interesting services. For example, we can configure tools related to VPN, either to securely access our network from outside the home or to create private connections between devices. It is one of those uses that fits very well with a device that will be powered on all day and connected directly to the network. Another very useful example is ad-blocking and DNS filtering solutions, such as Pi-hole or AdGuard Home, usually installable via Docker if they do not appear directly in the app store. With these types of services, the NAS can act as a filter for the entire home network, blocking many advertising requests or trackers before they even reach the phone, computer or Smart TV. It does not replace all browser protections, but it is a very practical function for those who want to have more control over their network. We can also find or install download services, self-hosted password managers, web servers, databases, development tools, home automation systems, monitoring panels or applications to sync files between computers. And this is where the device starts to feel more like a small home server than a simple storage system. Obviously, not all of these possibilities are intended for the same type of user. Anyone who only wants to store photos and documents will have enough with the basic functions, but anyone who enjoys tinkering has a huge amount of room to experiment. That flexibility is probably one of the most attractive parts of the system.  By the way, this is what the full TOS desktop looks like.  Just like in desktop systems such as Windows or macOS, TOS allows us to customise the visual appearance of the environment. From the user settings we can switch between light mode and dark mode, change the interface accent colour and even choose another wallpaper or upload our own. It is obviously not an essential function in a NAS, but it helps reinforce that feeling of using a complete operating system and not just an advanced configuration page.  We are almost done. Once the shared folders have been created, we can access them from other computers on the network very easily. In my case, from an iMac it is enough to connect to the local IP of the NAS through Finder for macOS to show the available shared resources. From there we can mount folders such as Jorge, Photos, public or Shared and work with them as if they were traditional network drives. Integration with macOS has been completely correct, allowing us to access files, copy content and use the NAS folders directly from the desktop. For the user, the experience is very similar to connecting an external drive, except that in this case the storage is centralised on the network and can be available to several devices at the same time.  To measure network performance, we carried out a test with CrystalDiskMark from a Windows computer connected by Ethernet cable, using a NAS shared folder as the destination. In this configuration, limited by a Gigabit connection, we obtained sequential speeds of around 116 MB/s in both reading and writing. These are very good figures for a 1Gbps network, as they are practically at the real maximum this type of connection can offer. This means that, in our test scenario, the bottleneck is not so much in the drives or in the NAS itself, but in the network being used. To make better use of the device's high-speed ports, we would also need a computer, adapter and switch compatible with higher speeds. In any case, for backups, large file transfers, shared storage and home or small-office use, the performance obtained is more than enough and shows that the system works stably when accessed from the local network.  We took advantage of the performance tests to check the exterior temperature of the device with a thermal camera. The measurements do not show anything worrying: the chassis remains at fairly moderate figures, generally in the 31 to 35 degree range, with slightly warmer areas near the rear and the fan, where we saw peaks close to 38 degrees. Considering that the tests were carried out with several drives installed, data transfer in progress and at a time of year already quite close to summer, the overall impression is positive. The ventilation system seems to do its job well and we did not notice excessive heating on the casing. As is logical, it is advisable to leave some space around the NAS and not enclose it in an unventilated cabinet, but under normal conditions the thermal behaviour seemed correct to us. Noise is also quite low, with a slight hum that is noticeable but not annoying.    To wrap things up, let's go over what we liked the most and what we liked the least. The best
 The less good
After several days testing it, the feeling this NAS leaves us with is frankly impressive. It is one of those products that you initially see as a system for storing files and end up understanding as something much more ambitious: a small home or professional server capable of centralising data, backups, multimedia, applications and all kinds of services. What we liked the most is that everything fits together. The build is excellent, the design conveys quality, the hardware has plenty of headroom for demanding use, and TOS is much more pleasant to use than we perhaps expected from a product of this type. The interface is visual, orderly and quite close to a desktop system, something that helps a lot to make the first contact less intimidating. We also find the enormous number of possibilities it offers very noteworthy. We can use it as a private cloud, multimedia server, backup centre, file syncing device, Docker platform, home automation server or even for more advanced projects. And the best part is that the system does not seem to struggle: with the Intel N350, 16GB of DDR5 RAM and M.2 slots for SSD cache, there is room to grow and experiment. That said, it is not a product for everyone. Its price, close to 800 euros without drives, clearly places it in an advanced range. In addition, to really take advantage of it, you need a certain technical interest and you have to spend some time understanding concepts such as volumes, RAID, TRAID, permissions, shared folders, backups or SSD cache. It is not difficult if you follow the assistant calmly, but it is not a simple external hard drive that you connect and forget about either. Even so, if we are looking for a powerful, well-built NAS with many expansion options and a surprisingly complete operating system, we loved this model. It is not cheap, but it constantly gives the feeling of being a serious device, prepared for much more than just storing files. For advanced users, small offices or self-hosting enthusiasts, it is a really attractive proposal. Here is the full product page
|
|
|
 |
 Estás aquí
|
||||||
|
||||||


